
Combine vert.x and mongo to build a giant
This blog post is part of the introduction to vert.x series. Last time, we have seen how we can use the vertx-jdbc-client to connect to a database using a JDBC driver. In this post, we are going to replace this JDBC client by the vertx-mongo-client, and thus connect to a Mongo database.
You don’t understand the title, check the mongoDB website.
But before going further, let’s recap.
Previously in ‘introduction to vert.x’
- The first post has described how to build a vert.x application with Maven and execute unit tests.
- The second post has described how this application can become configurable.
- The third post has introduced vertx-web, and a small collection management application has been developed. This application offers a REST API used by a HTML/JavaScript frontend.
- The fourth post has presented how you can run integration tests to ensure the behavior of your application.
- The last post has presented how you can interact with a JDBC database using the vertx-jdbc-client.
This post shows another client that lets you use MongoDB in a vert.x application. This client provides an vert.x API to access asynchronously to the Mongo database. We won’t compare whether or not JDBC is superior to Mongo, they have both pros and cons, and you should use the one that meet your requirements. Vert.x lets you choose, that’s the point.
The vertx-mongo-client documentation is available here.
The code developed in this blog post is available in the branch post-6. Our starting point is the code from the post-5 branch.
Asynchronous data access
One of the vert.x characteristics is being asynchronous. With an asynchronous API, you don’t wait for a result, but you are notified when this result is ready. Thanks to vert.x, this notification happens in the same thread (understand event loop) as the initial request:
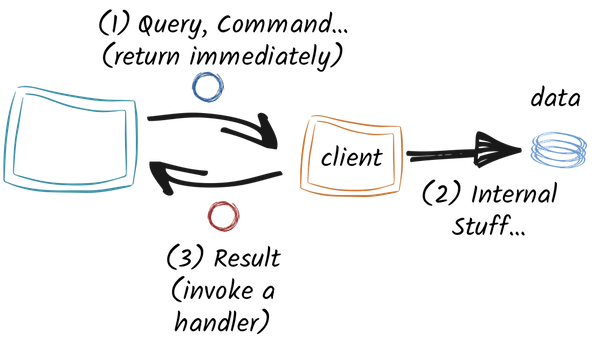
Your code (on the left) is going to invoke the mongo client and pass a callback that will be invoked when the result is available. The invocation to the mongo client is non blocking and returns immediately. The client is dealing with the mongo database and when the result has been computed / retrieved, it invokes the callback in the same event loop as the request.
This model is particularly powerful as it avoids the synchronization pitfalls. Indeed, your code is only called by a single thread, no need to synchronize anything.
As with every Maven project…
… we need to update the pom.xml file first.
In the pom.xml file, replace the vertx-jdbc-client by the vertx-mongo-client:
<dependency>
  <groupId>io.vertx</groupId>
  <artifactId>vertx-mongo-client</artifactId>
  <version>3.1.0</version>
</dependency>
Unlike JDBC where we were instantiating a database on the fly, here we need to explicitly starts a MongoDB server. In order to launch a Mongo server in our test, we are going to add another dependency:
<dependency>
  <groupId>de.flapdoodle.embed</groupId>
  <artifactId>de.flapdoodle.embed.mongo</artifactId>
  <version>1.50.0</version>
  <scope>test</scope>
</dependency>
This dependency will be used in our unit tests, as it lets us start a mongo server programmatically. For our integration tests, we are going to use a Maven plugin starting and stopping the mongo server before and after our integration tests. Add this plugin to the <plugins/> section of your pom.xml file.
<plugin>
  <groupId>com.github.joelittlejohn.embedmongo</groupId>
  <artifactId>embedmongo-maven-plugin</artifactId>
  <version>0.2.0</version>
  <executions>
    <execution>
      <id>start</id>
      <goals>
        <goal>start</goal>
      </goals>
      <configuration>
        <port>37017</port>
      </configuration>
    </execution>
    <execution>
      <id>stop</id>
      <goals>
        <goal>stop</goal>
      </goals>
    </execution>
  </executions>
</plugin>
Notice the port we use here (37017), we will use this port later.
Enough XML for today
Now that we have updated our pom.xml file, it’s time to change our verticle. The first thing to do is to replace the jdbc client by the mongo client:
mongo = MongoClient.createShared(vertx, config());
This client is configured with the configuration given to the verticle (more on this below).
Once done, we need to change how we start the application. With the mongo client, no need to acquire a connection, it handles this internally. So our startup sequence is a bit more simple:
createSomeData(
    (nothing) -> startWebApp(
        (http) -> completeStartup(http, fut)
    ), fut);
As in the previous post, we need to insert some predefined data if the database is empty:
private void createSomeData(Handler<AsyncResult<Void>> next, Future<Void> fut) {
  Whisky bowmore = new Whisky("Bowmore 15 Years Laimrig", "Scotland, Islay");
  Whisky talisker = new Whisky("Talisker 57° North", "Scotland, Island");
  System.out.println(bowmore.toJson());
  // Do we have data in the collection ?
  mongo.count(COLLECTION, new JsonObject(), count -> {
    if (count.succeeded()) {
      if (count.result() == 0) {
        // no whiskies, insert data
        mongo.insert(COLLECTION, bowmore.toJson(), ar -> {
          if (ar.failed()) {
            fut.fail(ar.cause());
          } else {
            mongo.insert(COLLECTION, talisker.toJson(), ar2 -> {
              if (ar2.failed()) {
                fut.failed();
              } else {
                next.handle(Future.<Void>succeededFuture());
              }
            });
          }
        });
      } else {
        next.handle(Future.<Void>succeededFuture());
      }
    } else {
      // report the error
      fut.fail(count.cause());
    }
  });
}
To detect whether or not the database already contains some data, we retrieve the number of documents from the whiskies collection. This is done with : mongo.count(COLLECTION, new JsonObject(), count -> {}). The second parameter is the query. In our case, we want to count all documents. This is done using new JsonObject() that would create a query accepting all documents from the collection (it’s equivalent to a SELECT * FROM ...).
Also notice the insert calls. Documents are passed as JSON object, so to insert an object, just serialize it to JSON and use mongo.insert(COLLECTION, json, completion handler).
Mongo-ize the REST handlers
Now that the application boot sequence has been migrated to mongo, it’s time to update the code handling the REST requests.
Let’s start by the getAll method that returns all stored products. To implement this, we use the find method. As we saw for the count method, we pass an empty json object to describe a query accepting all documents:
private void getAll(RoutingContext routingContext) {
  mongo.find(COLLECTION, new JsonObject(), results -> {
    List<JsonObject> objects = results.result();
    List<Whisky> whiskies = objects.stream().map(Whisky::new).collect(Collectors.toList());
    routingContext.response()
        .putHeader("content-type", "application/json; charset=utf-8")
        .end(Json.encodePrettily(whiskies));
  });
}
The query results are passed as a list of JSON objects. From this list we can create our product instances, and fill the HTTP response with this set.
To delete a specific document we need to select the document using its id:
private void deleteOne(RoutingContext routingContext) {
  String id = routingContext.request().getParam("id");
  if (id == null) {
    routingContext.response().setStatusCode(400).end();
  } else {
    mongo.removeOne(COLLECTION, new JsonObject().put("_id", id),
        ar -> routingContext.response().setStatusCode(204).end());
  }
}
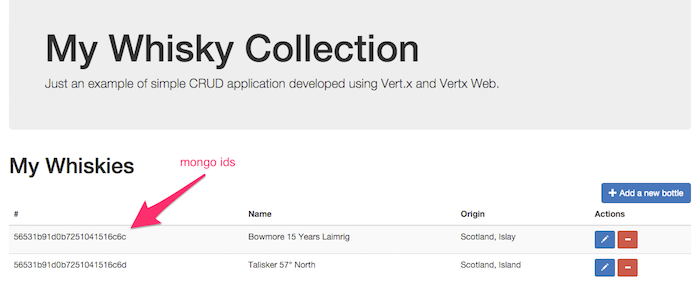
The new JsonObject().put("_id", id) describes a query selecting a single document (selected by its unique id, so it’s the equivalent to SELECT * WHERE id=...). Notice the _id which is a mongo trick to select a document by id.
Updating a document is a less trivial:
private void updateOne(RoutingContext routingContext) {
  final String id = routingContext.request().getParam("id");
  JsonObject json = routingContext.getBodyAsJson();
  if (id == null || json == null) {
    routingContext.response().setStatusCode(400).end();
  } else {
    mongo.update(COLLECTION,
        new JsonObject().put("_id", id), // Select a unique document
        // The update syntax: {$set, the json object containing the fields to update}
        new JsonObject()
            .put("$set", json),
        v -> {
          if (v.failed()) {
            routingContext.response().setStatusCode(404).end();
          } else {
            routingContext.response()
                .putHeader("content-type", "application/json; charset=utf-8")
                .end(Json.encodePrettily(
                  new Whisky(id, json.getString("name"),
                    json.getString("origin"))));
          }
        });
  }
}
As we can see, the update method takes two JSON objects as parameter:
- The first one denotes the query (here we select a single document using its id).
- The second object expresses the change to apply to the selected document. It uses a mongo syntax. In our case, we update the document using the
$setoperator.
In this code we update the document and replace only a set of fields. You can also replace the whole document using mongo.replace(...).
I definitely recommend to have a look to the MongoDB documentation, especially:
Time for configuration
Well, the code is migrated, but we still need to update the configuration. With JDBC we passed the JDBC url and the driver class in the configuration. With mongo, we need to configure the connection_string - the mongo:// url on which the application is connected, and db_name - a name for the data source.
Let’s start by the unit test. Edit the MyFirstVerticleTest file and add the following code:
private static MongodProcess MONGO;
private static int MONGO_PORT = 12345;
@BeforeClass
public static void initialize() throws IOException {
  MongodStarter starter = MongodStarter.getDefaultInstance();
  IMongodConfig mongodConfig = new MongodConfigBuilder()
      .version(Version.Main.PRODUCTION)
      .net(new Net(MONGO_PORT, Network.localhostIsIPv6()))
      .build();
  MongodExecutable mongodExecutable =
      starter.prepare(mongodConfig);
  MONGO = mongodExecutable.start();
}

@AfterClass
public static void shutdown() {  MONGO.stop(); }
Before our tests, we start (programmatically) a mongo database on the port 12345. When all our tests have been executed, we shutdown the database.
So now that the mongo server is managed, we need to to give the right configuration to our verticle. Update the DeploymentOption instance with:
DeploymentOptions options = new DeploymentOptions()
    .setConfig(new JsonObject()
        .put("http.port", port)
        .put("db_name", "whiskies-test")
        .put("connection_string",
            "mongodb://localhost:" + MONGO_PORT)
);
That’s all for the unit tests.
For the integration-test, we are using an externalized json file. Edit the src/test/resources/my-it-config.json with the following content:
{
  "http.port": ${http.port},
  "db_name": "whiskies-it",
  "connection_string": "mongodb://localhost:37017"
}
Notice the port we are using for the mongo server. This port was configured in the pom.xml file.
Last but not least, we still have a configuration file to edit: the configuration you use to launch the application in production:
{
  "http.port": 8082,
  "db_name": "whiskies",
  "connection_string": "mongodb://localhost:27017"
}
Here you would need to edit the localhost:27017 with the right url for your mongo server.
Because mongo document id are String and not integer, we have to slightly change document selection in the integration test.
Time for a run
It’s time to package and run the application and check that everything works as expected. Let’s package the application using:
mvn clean verify
And then to launch it, start your mongo server and launch:
java -jar target/my-first-app-1.0-SNAPSHOT-fat.jar \
  -conf src/main/conf/my-application-conf.json
If you are, like me, using docker / docker-machine for almost everything, edit the configuration file to refer to the right host (localhost for docker, the docker-machine ip if you use docker-machine) and then launch:
docker run -d -p 27017:27017 mongo
java -jar target/my-first-app-1.0-SNAPSHOT-fat.jar \
  -conf src/main/conf/my-application-conf.json
# or
java -jar target/my-first-app-1.0-SNAPSHOT-fat.jar \
  -conf src/main/conf/my-application-conf-docker-machine.json
That’s all folks!
We are reaching the end of this post. We saw how you can use the vert-mongo-client to access asynchronously data stored inside a mongo database as well as inserting/updating this data. Now you have the choice between JDBC or Mongo. In addition, vert.x provides a client for Redis.
Next time, we will see how the verticle class can be split in two verticles in order to better organize your code. The interaction between the two verticles will uses services.
Stay tuned & Happy coding!

Next post

Previous post
Vert.x ES6 back to the future

On October 21th, 2015 we all rejoiced with the return from the past of Marty McFly with his flying car and so on, however in the Vert.x world we were quite sad about our rather old JavaScript support.
Read moreRelated posts
Unit and Integration Tests
Let’s refresh our mind about what we developed so far in the introduction to vert.x series. We forgot an important task. We didn’t test the API.
Read moreUsing the asynchronous SQL client
Finally, back... This post is the fifth post of the introduction to vert.x blog series, after a not-that-small break. In this post we are going to see how we can use JDBC in a vert.x application.
Read moreMy first Vert.x 3 Application
Let's say, you heard someone saying that Vert.x is awesome. Ok great, but you may want to try it by yourself. Well, the next natural question is “where do I start ?”
Read more